
Photo is from Becky Higgins blog
Anyways, back to the blog post. Week 17 is now done. A basic week around the house, spent a lot of time outside. And we had my mom here for a visit, we always love that.
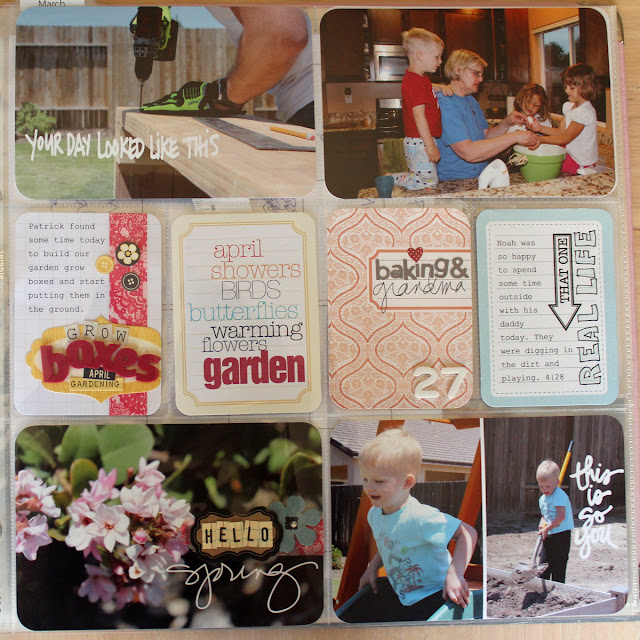
FIRST PAGE :

THE PICTURES :
Used this brush.

We bought a swing set for the backyard.

Used Ali Edwards Circle Of Life Brush.

THE JOURNALING CARDS :
LEFT SIDE : The happy banner I believe is from Dear Lizzy Neapolitan . Letters from October Afternoon.
TIP #1 OF THE DAY. Most of you might already know, but I'm going to share anyways. If you don't want the xtra bulkiness of chipboard pieces on your pages, or journaling cards, peel the extra layers off. I do this all the time with the chipboard pieces I put into my PL album. I strip them down to just the paper layer so that I can fit more into my album !!
RIGHT SIDE : I found a picture from online about the Hunger Games and sized it to fit right onto the journaling card. Put our ticket stubs on top and called it good.

LEFT SIDE :
Washi tape, and a heart brush from Ali Edwards. Arrow from Studio Calico.
RIGHT SIDE : Sticker from Echo Park Note to Self. Butterflies are from Studio Calico.

THE SECOND PAGE :
THE PICTURES :
Use this brush.
Patrick spent the weekend building garden grow boxes and then putting them in the ground. Not an easy thing !!

Used a word from here .
Added Washi tape a flower and hello.
TIP #2 OF THE DAY : If you are running out of letters in your letter sticker sheets. Try to look and see if you can use one of the other letters and then use a pen to make a new letter. For example I took an F and turned it into and e for my HELLO below. I also used the C and turned it into and O. You can't tell unless you look really, really close.

You Are Awesome Brush from Ali Edwards .
Pictures of Noah from the weekend.

THE JOURNALING CARDS :
LEFT SIDE :
A strip of Washi tape down the side. All the stickers are from Jillibean Soup Coconut Soup collection(except for the letter stickers) which is all about spring, gardening, and such.
RIGHT SIDE :
I used this great Spring freebie card. Placed it over the yellow journaling card in photoshop. Reduced the opacity of the freebie card so that I could see where the letters would end up when i printed it out onto the yellow card. I then moved the words around so that they would print where I wanted them on the card and printed. I love the end result, I wanted something else besides a white background card. ** Also changed the colors of the words to match.

LEFT SIDE :
I used a Studio Calico journaling card. Added the word grandma from Ali Edwards family brush and then added the other letters and the number 27 for the date.
RIGHT SIDE :
I outlined the REAL LIFE that is on the journaling card so that it would stand out more. Added the arrow rubon from Jenni Bowlin.

That is the end of week 17.
I just wanted to let you know that the kids and I are leaving for Utah on Sunday for 2 weeks. So I will plan on doing some photo only posts while I am there. I need to share our beach photos. But unfortunately no Project Life posts until I get back. Thanks for the understanding. Hope this post will tide you guys over until I get back.
Happy Summer to everyone. Go have some fun and enjoy this great time of the year.
6 comments:
Hi Mindi! I've been following your blog since 2011 and I found your awesome tutorial (thanks for sharing!) on how to print on journalling cards. I've tried adjusting the template for the old sized journalling cards to fit the new ones, but I can't quite get it right. It's driving me batty!! Would you be able to explain how to make a template for the new size of journalling cards?
great tip about the chipboard!
love your pages!
Pam -
Yes, if you can be patient with me. Im heading out of town. I'll see if I can't get one for you while I'm there.
Pam,
Just a quick question on how you are trying to print on the journaling cards. So that I can try to help you. Are you printing directly from your printer ? Thanks
Hi Mindi! Yes, I'm doing it the exact same way that you used in your tutorial posted on Dec 8th 2011. I tried to resize the print guide and journalling box to match the PL digital journalling cards, but somehow they don't line up. No rush with the template! I'm not in a hurry, it was just driving me nuts as I was trying to do it. Thank you so much for your help!
Pam,
So the print guide that you use was made by Liz at paislee press. The good news is that I looked on her website to see if she had made a new print guide for the new cards and she did !!! Yeah !! So check it out and you can download the new print guide below.
copy and paste this address below
http://www.oscraps.com/shop/product.php?productid=27796.
Download the new print guide and you are good to go !!
Let me know if you need anything else ok.
Post a Comment